Painting Wooden Furniture: How To Go About It And Some Tips
If you want to change the face of your wooden furniture, we show you how to paint it step by step. With these tips, they’ll look like they’ve been done by a professional.
Do you want to remodel your cabinets, but don’t really know where to start? In this article, we’ll give you some tips to make them look as good as new. Painting wooden furniture is easy and you just need to take into account a few specific guidelines.
Wood is such a noble material that it is present in most homes. Whether in the form of tables, chairs, doors, dressers and ornaments.
It just happens to be so versatile and durable that it gives us endless possibilities for recycling and repackaging. That is to say that from the same room, we can have different styles over time without having to invest in a new piece of furniture.
Features and advantages of wooden furniture
Choosing wooden furniture brings us many advantages, some of which we will review below:
- Wood brings warmth to the house : being a material of natural origin, an environment decorated in this way becomes cozy and very comfortable.
- It’s a classic that will never go out of style. Wooden furniture will always be in fashion, whatever the trends of the moment.
- Wooden furniture is easy to clean and repair or restore.
- These are very durable products, so much that many become a legacy and a family tradition. They are passed down from generation to generation.
How to paint wooden furniture?
Painting wooden furniture is simple, but it has its secrets. The most important thing about the two options that we present below is that you must carefully follow each of the steps without omitting any of them.
Also stick to the materials we suggest, as not all stains or paints can be applied to wood. That being said, let’s move on to the first option.
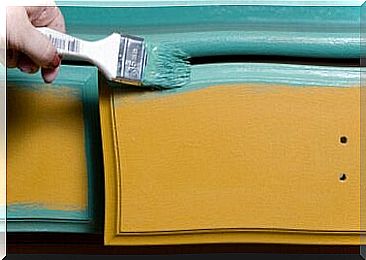
Paint a wooden cabinet with colors
For this alternative, the first thing we’ll do is sand the entire surface well. This step is essential and forms the basis for our final work to resemble that of a professional.
With the sandpaper we will remove the remnants of varnish, dirt, grease and others. Remember that you must run the sandpaper in the direction of the grain of the wood.
When you see that there are no more old traces of paint or varnish, you will need to wipe down the dust that has been left behind. If you don’t remove it, the paint you apply later will not stick.
We will now apply the primer. This is a paint that is applied to the wood before applying the color that we have chosen.
Let it dry for a few hours and when it is dry you can apply the first coat of the final paint. You will likely need to apply more than one coat, so you will need to let dry between each coat.
Finally, apply a coat of colorless varnish (mat or gloss) to protect the paint and make it last longer.
As for the materials, you will need a brush for the corners and grooves and a roller (foam or wool). Sizes and materials vary depending on the dimensions of the cabinet and what is most comfortable for you to work with.
Restore a piece of furniture with varnish
In this second option, we will work with varnish to reshape a wooden cabinet. The varnish can be colorless or have a certain tone. The choice will depend on the condition of the base wood.
The first thing we are going to do is remove the stains from the wood using the products provided for this purpose. Next, we will go through a medium-grit sandpaper to remove the remnants of the previous varnish and other imperfections from the furniture. To give it a good finish without scratches, the ideal is to use a fine steel wool.
Next we will apply a first coat which is similar to the primer from the previous point. This way the final stain will stick better to the wood. It comes in the form of an oil or a spray.
Once the layer has dried well, we will iron a sandpaper, but this time fine-grained. This will help the next coat of paint set better. After the sandpaper, we will pass a cloth to remove dust.
Now is the time for the main painting. The first layer should be thinly thinned, while the second is a little thicker. It is important to allow at least 24 hours to dry between coats of paint.
General tips to keep in mind when painting wood furniture
We are going to give you some important tips to start reforming your wooden furniture. Often times we want to emulate a design that we have seen somewhere, but which cannot always be applied to the furniture that we have at home.
Which elements to choose?
When you are going to choose the paint, make sure it is suitable for what you want to do. Read the labels and the manufacturer’s instructions carefully before buying it and, most importantly, when applying it.
For example, if we want to restore outdoor furniture, the varnish must be more resistant to water and sunlight. If the material is wicker, the ideal is a spray that penetrates well in every nook and cranny.
When it comes to work items, the variety of brushes and rollers can be overwhelming. In this sense, the most important thing is to take into account the piece of furniture you need to paint.
For large, smooth surfaces, a roller is preferable, as brushes can leave marks with their bristles. When it comes to working on moldings, angles and corners, we suggest switching to a brush.
On assembled or disassembled furniture?
That’s the million dollar question. Again, this will depend on the type of furniture. While it is easy to disassemble, we recommend doing so to make sure all the nooks and crannies are accessible and everything is paint protected.
If you absolutely can’t take it apart, remove parts like handles, drawers, and shelves to at least make sanding and painting easier.
Is priming mandatory?
Yes, it’s about saving time and paint. After the application of a primer, the wood is ready to be worked and the finish will be optimal. Always check the type of furniture you need.
What should I paint first and how?
We are going to paint from the inside to the outside. We start with the moldings and corners using a brush, then move to larger areas with a roller.
The direction to follow for passing both the brush and the roller is in favor of the grain of the wood. It is not advisable to overload the brush to prevent the paint from flowing.
Painting wooden furniture at home is rewarding
There are two very important moments when painting wooden furniture: the beginning and the end. Be sure to prepare the surface well before painting and do not fall into the fear of finishing quickly.
A clean surface, free from impurities and dirt, guarantees the fixing of the paint. If the furniture has many imperfections, you can apply putty in a tone similar to the furniture.
Finally, the finish that we want to give it is the last step to make it perfect. Either you varnish it, or you apply products to give the wood an aged look, or you go for a cracking, the options are endless.